
Event Report Photos
Good quality photos are needed to report events to Mother and to public.
We use your photos for Video report, PowerPoint report, Web site and Printing.
What kind of shots are needed for report:
Photos that can tell the story should cover:
Where: Location, Building, Sign, Banner
When: Shots of signs, banner, etc. that including Date / Location
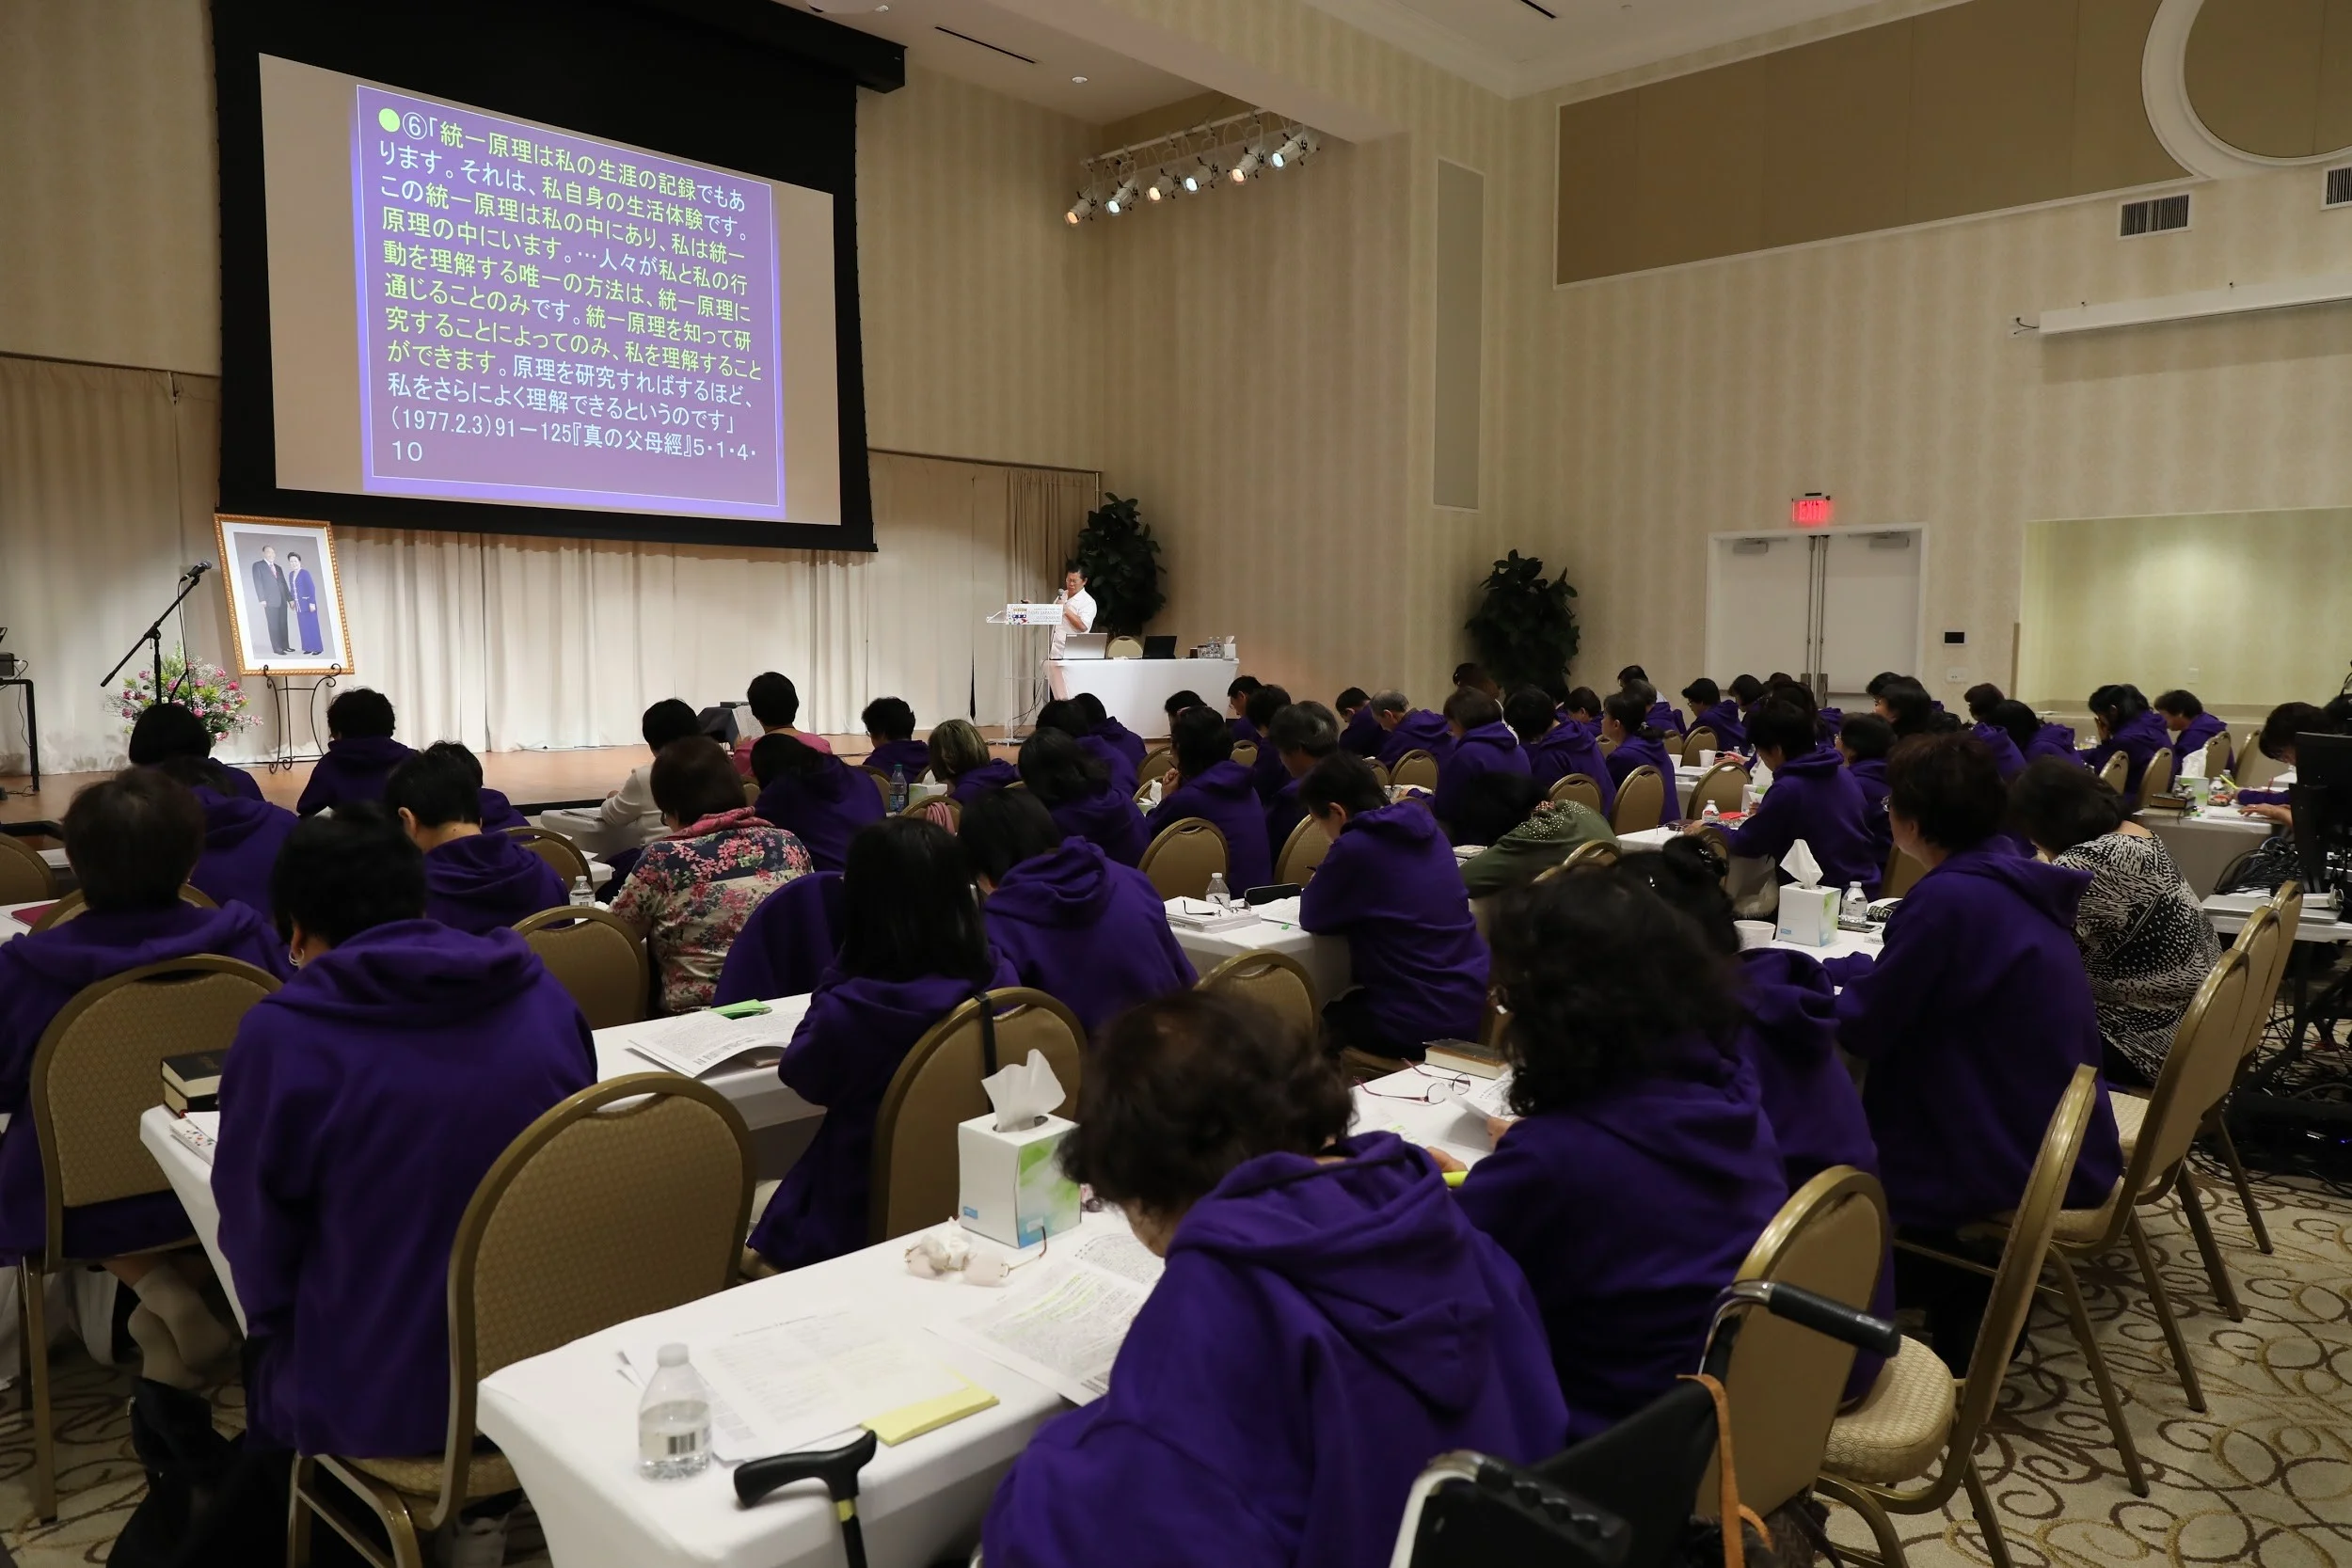
How: how the room was set, how many people are attending (Wide shots of the room)
Who: Speakers, Audience
What: What kind of event it is,
Supporting shots: Group photos, artistic shots, photos of program and name tags of key people etc.
Think how you tell the story by flipping your photos. We need a lot more photos than you think, to support the story. One photo per speaker is not enough. In the story when you introduce the main speaker, you may say few points about that person, you need to flip a few different photos of that person during that part. If you have the shots of the speaker in Wide Shot, Medium Shot, Close Up Shot, each one taken from Left, Center, Right, you have enough photos to cover the story. You may show one photo of the speaker for 4 second, and if you have 5 photos of that person, you can talk about that person for 20 second. If you have only 1 photo, you can’t say so much about the person. Also, when you tell the story, you may say serious thing and happy thing. If you only have smiling photos, they don’t support serious story. So we should take normal expression of face not only smiling face.
Here are examples of shots.
- Wide (from Left, Middle and Right)
- Medium (waist shot)(from Left, Middle and Right)
- Close up (from Left, Middle and Right)
- Group photos
- Audience
- Outside of building
- Signs, Bunner
- Artistic shots
- Photo of program, poster, brochure (good reference for names and other information)
Outside of building & signs, banners, etc.


Wide Shots
Wide shots can show what kind of place, what kind of setting it is (banquet in this case), how many people are attending, what kind of people are there. Also the banner shows the event name. For each speaker/singer, we should shoot few different type of shots, not just close up.
Wide from right:

Wide from center:

Wide from left:

Wide shot:


Medium shot:


Medium-close:

Close-up:

Artistic shots, Extra shots, Behind-the-Scene shots


Close Up Shots
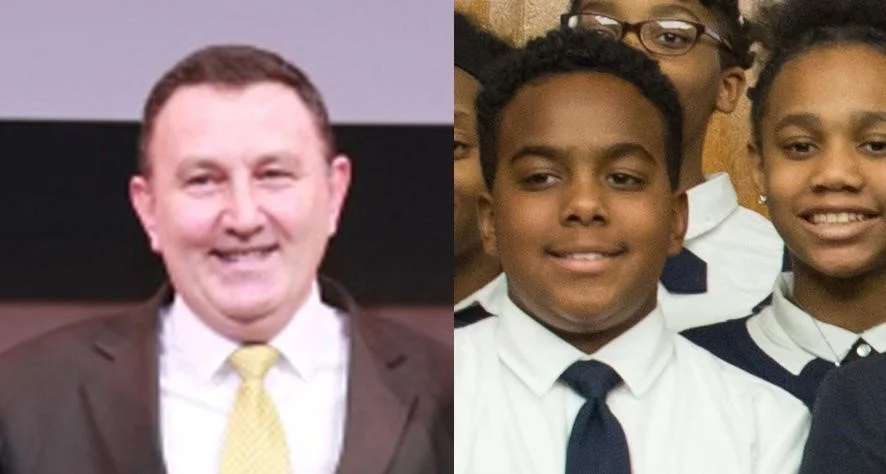
When you shoot close ups for event report photo, you don’t have to go too close. Please think about the space to place person’s name and position (2 lines) under his/her face.
Too Close:

This is too close. Not much space to put name.

Too tight to put his name. For video report, we place name, but in this case not enough space under his face.
Good Close-Up:

For most of report photos, you don’t have to go too close. This is good close up. Enough space under his face to place name.
Good Close-Up with name:

Mid-Close Shot with name:

If you submit mid-close shots like this, we can still place the name under face. Also we can crop close if we need to. This shot is more useful than the first example that is too close and we can’t do anything about it.
Audience Shots
- Find good audience , When the event starts, look around and find the good looking people and area of good people who are positive and participating. When you find the right moment, quickly go back to catch them.
- When you see good looking people, you can get close up shots of them, but generally shoot group of people instead of just one or two people.
- VIPs
- Fully participating, paying attention to the subject
- Different kinds of people, Young-Elder, etc.
- Not sleeping, Not taking photos,
- If many people are sleeping, shoot from side and back, do not show sleepy faces (That means, you shoot variety of wide shots from back as you see some examples in this document.)
Pay attention to what in the shot (Distracting thing/person/action)
- Audience making funny face
- Someone in the shot stands out and take attention from main subject
- Someone in audience not paying attention to the subject
- “Exit Sign” etc in the shot very subjectively
- Avoid busy background
Group Photo
- Everyone is looking at your camera (not other camera)
- Clean up bags, paper, chairs, table, etc
- Check the balance (Top, Bottom, Left, Right)
- Have some room on the side (Left-Right) when you use wide lens to minimize distortion
Distracting actions in the shot
1. A person taking picture in the middle of shot.

2. Before you take the photo, wait until she finish taking her photo. It is better than #1.

3. But one person is not paying attention to the main speaker. So this shot is not really good because of this one person.

Basic Framing
- Wide to Medium shot with logo (banner, True Parents photo, etc.) with subject
Bad Framing:
What’s wrong with this? Subject-Object reversed. Person is Subject, Logo is Object. In this picture the person is NOT in the subject position and Logo is very Subjective.

Good Framing with Logo:

Vertical Position

Horizontal Position

Another good framing sample:

Vertical Position

Horizontal Position

Another example of bad framing (with True Parents’ Photo on stage):
In many cases, we have True Parents’ photo on stage behind the speaker. Even it is True Parents, important people, but in this case, the speaker is the Subject and True Parents’ Photo is Object.
In this photo, True Parents’ photo is in the Subject position and the speaker is Object. Always think about what is subject in your photo and treat subject as subject. And let object to harmoniously support the subject, not fight with subject.

Good Framing:
Place your Subject in the subjective position, then include the object in the place that supports subject. Here Dr. Kim is in the subject position. His head is about ⅓ from the top. (That means his body occupies bottom ⅔ of photos. Note that the above photo doesn’t have his body. )

How you focus (Use right Focus Point helps you to frame better.)
Today’s cameras are almost all auto focus. Your camera has “Auto Focus Sensor” with multipul focus points.You can select which point you use to focus what you want.
Here are some examples of Auto Focus Points:
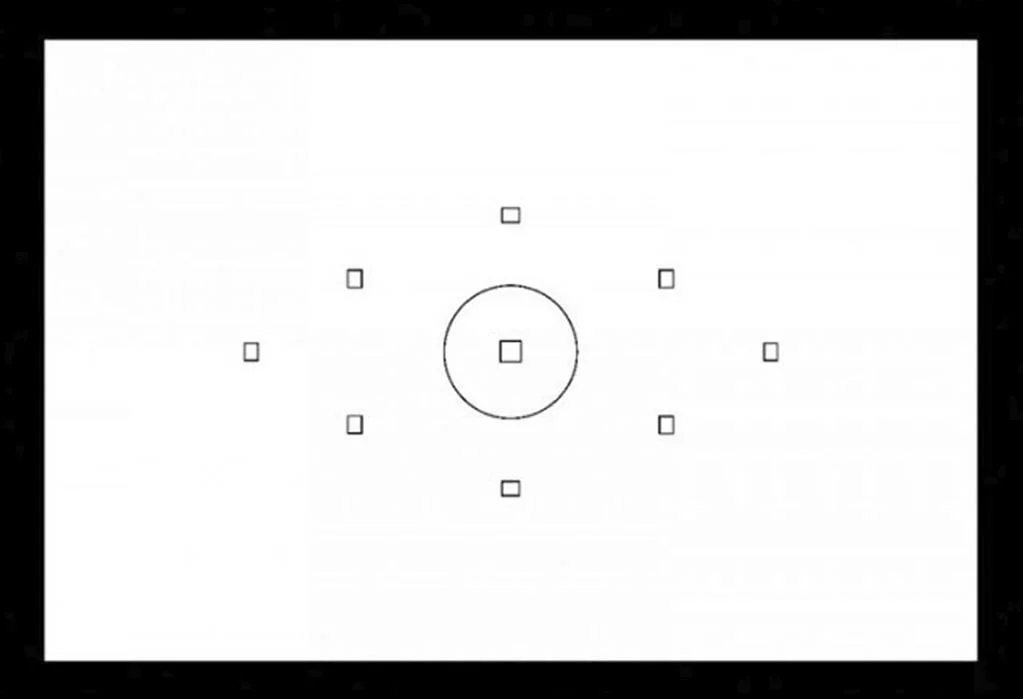


If you only use center Focus Point, your shots tend to be like this:

What is wrong with this?
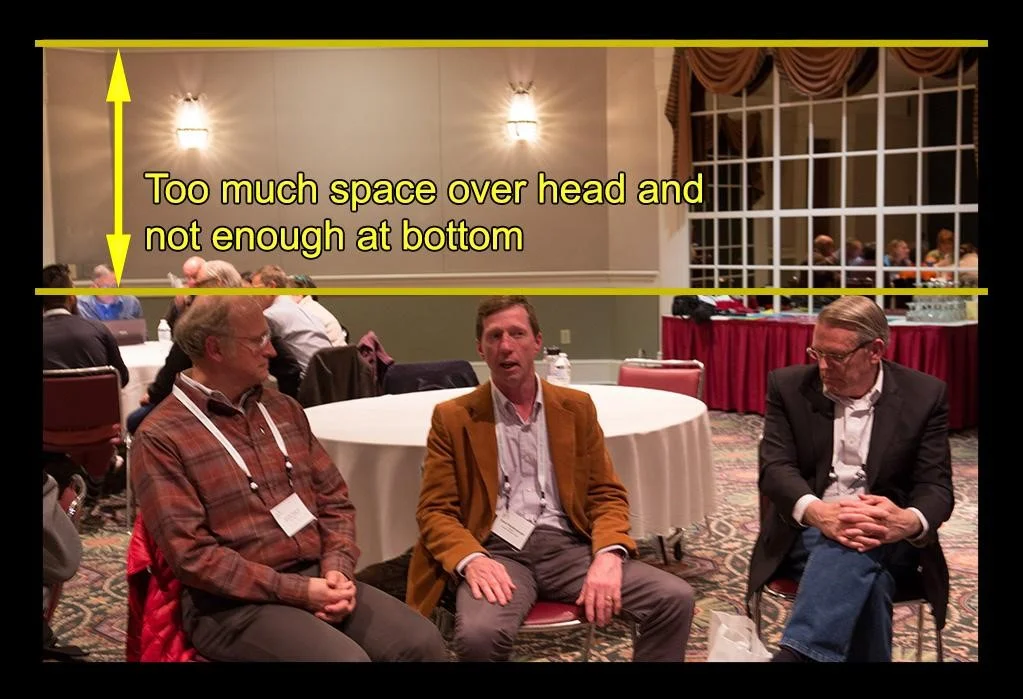
One reason to have this kind of shot is using center focus point. Center Focus Point is selected right over the subject’s face.

But if you use this focus point (top one), you can easily shoot better without too much space on top of frame. In this case, select the top Focus Point and place subject’s face under that point.

Here is another example of using the center focus point and shoot. Subject’s face is in the middle of frame, having too much space above head and to subject’s right side:

Center Focus Point is selected right over the subject’s face.

Instead, we should use this focus point and shoot this way:

Then when we edit, crop extra space. Final result is this:

To get one good shot, we need to take a lot of shots.
To catch this moment, we have to take a lot of shots. Perfect focus, exposure, expression of face, etc.

It takes more than you think is enough. Check what you got. Focus, expression of face, lighting, etc. If you didn’t have the one, go back and take more. When you check your photo, hide yourself from other photographers, video cameras and audience. Don’t just stand in the middle of room and block other people’s view.

Framing 2 people (Subject Object of 2 people in a shot)
When you take 2 people in one shot, think about Subject-Object relationship.
What’s wrong with this photo?

There is no Subject. Two Objects.
What’s wrong with this photo?

Two Subjects.
You can see there is Subject and there is Object in this photo (below). By de-focusing one of two people, you can make one as Subject and other, Object.

And this one is better without extra object in the shot. Shooting slightly lower angle:

2 people with Subject – Object:

Vertical vs Horizontal shots
- We need more Horizontal photo than vertical ones. Because we use your photos for video report. Video is Horizontal. To use vertical photos in video, we have to fill the side of photo and your photo will be smaller.
- If you like to take Vertical photo, please shoot same subject in Horizontal as well.
Vertical Photo placed on video frame:

Horizontal photo on video frame:

Pay attention to other people in the event (video camera, other photographer, audience)
- Good photographer is invisible. They came and get good shots quick and hide themselves.
- When you get in the room, take your time to see if there are video cameras or other photographers
- Video cameras can’t move so much, Make sure you do NOT:
1, block video camera’s view,
2, stand in the shot of other camera.
- When you check your shots, step out to the blind spot of other cameras and audience.
Example of another cameraman in the shot:

Always pay attention to where other cameraman is and avoid in the shot of other camera. When you see other cameraman ready to shoot, be out of shot and come back after he/she finishes taking. Don’t be in the shot of video camera. Video camera can’t move it’s position and its shooting all the time. Check the framing of video camera and find the safe position.
Cropping:
Please submit uncropped photos.
This is the original shot of wide group:

This is over cropped:

It is ok as it is. But we often use your photo on video. This photo has problem in report video.
Video aspect ratio is 16:9 but the over cropped photo is too short:

When we place the over cropped photo on the video, we have to fill the empty space on top and bottom:

Please send the un-cropped photos as well as cropped photo. From uncropped photo we can use the photo on video without black bar on top & bottom.

Delivery
Submit JPEG photos (but not too compressed) also submit RAW files. If you submit RAW files, we can do a lot with those files. Especially adjusting color and exposure.
JPG file from Camera
Highlight is blown out, no detail in dark area:

Processed photo from RAW file
Blown highlight and detail in the dark area are recovered by processing RAW file:

Camera setting to shoot with Raw files & JPEG files
- Camera setting
- Bigger memory card needed
Set camera to shoot both RAW and JPEG for Canon 5D, (RAW and Medium size High Quality JPEG is selected):

Set camera to shoot both RAW and JPEG for Sony A7:

File size
Two things about the size
1. Pixel dimension (Resolution): Bigger the better
2. Compression: Less is more
Sometimes, we receive photos that are very small in size.
Here is one example of small photo. Pixel dimension of this photo is only 1024 x 683. Also heavy compression made the file size very small.

This photo is taken by over 22 Mega Pixel camera. Pixel dimension of this photo is 5760 x 3840.

Next picture will show you how different these are:

Here is the comparison beween those 2 photos. In Korea, they show 4K video to Mother that is 4 times bigger than HD video (3840×2160). Almost 16 time bigger than the submitted photo.
It is almost ¼ of HD Video size (1920×1080):

That means we have to blow up 4 times to fill the screen.
When we blow up photos we lose detail. You can see the difference between big original photo (right) and blown up small photo (left) here:
Please send us photos bigger than HD video (1920×1080).
JPEG files (Compression quality)
- JPEG format compresses files when you save it. That means it throws away detail information and lowers quality. Once it does that you can’t get back the lost information. In the early 1990’s when internet started, network connection was very slow. That time we had to compress images a lot to send the pictures through low bandwidth. We were trading off quality and file size. We do not worry about that (file size) today. So you don’t need to compress files. You can control how much you compress image when you save yor photos. When you save JPEG files please use least compression = Highest Quality setting.
High quality JPEG (Minimum compression):

599 x 533 pixels, 252 KB (same pixel dimension but bigger file size)
Low quality JPEG (Heavy compression):

599 x 533 pixels, 39.2 KB (same pixel dimension but smaller file size, lost information)
Saving files in JPEG format
Use Maximum Quality setting.

Not like this. Do not use anything less than Maximum or High quality.

Also if your camera saves only in JPEG format without RAW file, please make sure your camera is saving the photo files in Highest quality.
One example of JPEG quality setting (Canon Camera):

Select “Large” and “High quality” for the best quality photo.
If you are shooting and editing RAW file, you may use Medium size High Quality setting instead of Large to save your storage space.
Lighting is the most important thing for photo and video.L
If the lighting is too low you end up low quality photo/video with a lot of noise, less detail and less saturation (color). Also camera’s auto-focus unit doesn’t function well in the dark room. It tends to focus bright spot. So if the speaker’s face is dark and there is bright screen next to the speaker, camera focuses on the screen and your subject became out of focus.
General setting of your camera
ISO setting
- ISO is the level of sensitivity of your camera to available light. The higher ISO number increases the sensitivity of your camera. (so you can shoot in the darker situation)
- Generally keep it between 200 to 800. If it is really dark use 1600 to 2000. If it is set to over 3200 your photo will be too noisy and almost useless.
- To find out more read this: https://photographylife.com/what-is-iso-in-photography
Shutter Speed
- Slower shutter speed will give you risk of blur
- Generally keep it between 1/100 to 1/500 sec.
- If you use Telephoto lens (longer lens) shutter speed should be faster. If you use 100mm lens, use minimum 1/100. For 200mm use minimum 1/200.
- If you have to use Flash, do not use faster than 1/250
- To find out more read this: https://photographylife.com/what-is-shutter-speed-in-photography
Lens aperture (iris “f-stop”)
- Really case by case but keep it around f4 to f8
- Smaller number gets more light into lens, photo will be brighter, background will be more defocused
- To find out more read this: https://photographylife.com/what-is-aperture-in-photography
White Balance
It is important to set the white balance properly especially you save photo only in JPG file format.
Please take your time to learn how to set white balance manually.
- Manual: Best if you can set it and in the consistent lighting situation
- Preset: Outdoor (Sunlight, Cloudy/shade), Room light, Fluorescent light, etc. Always test and check the color
- Auto (AWB), If you don’t have time
- Set number (indoor, try 2800 ~ 3300 and test & check)
Color sift (especially with projected screen in shot):

Trackback from your site.